
우리는 웹 개발을 하다 보면 구글맵, 구글지도(Google Map)을 다루는 경우가 종종 있습니다. 그때마다 구글맵에 우리가 원하는 위치를 표현하기 위해서 마커를 사용하곤 하죠. 기본적인 마커 구현으로 끝나는 경우도 있지만 구현하는 서비스 특색에 맞게 커스텀 마커를 적용해야 되는 경우가 있습니다. 하지만 구글맵에서 제공하고 있는 API의 마커(Marker)를 활용해서 우리의 서비스에 맞는 커스텀 마커를 구현하기에는 굉장히 어려움이 많습니다. (커스터마이징 하기 너무 까다롭습니다.)
이번 포스팅에서는 Google Map API에서 제공하는 OverlayView 클래스를 활용해서 커스텀 마커(Custom Marker)를 구현해보도록 하겠습니다.
들어가기 전에
저는 이번 포스팅에서 Vue 개발환경에서 구글맵 커스텀 마커 예시를 구현할 예정입니다. 물론 기본 동작 방식은 같으므로 React를 활용하셔도 되고, Pure Javascript로 구현하셔도 됩니다. 구현하기 편하신 라이브러리로 개발환경을 구성해주세요!
예시에 사용될 샘플데이터는 아래와 같습니다.
샘플데이터
const sample = [
  { latitude: 37.5047592, longitude: 127.0415586, price: "₩52" },
  { latitude: 37.5082055, longitude: 127.0363408, price: "₩66" },
  { latitude: 37.5055726, longitude: 127.0294372, price: "₩40" },
  { latitude: 37.4994, longitude: 127.03545, price: "₩39" },
  { latitude: 37.4916279, longitude: 127.0289673, price: "₩43" },
  { latitude: 37.49479, longitude: 127.03665, price: "₩54" },
  { latitude: 37.5052889, longitude: 127.0258825, price: "₩50" },
  { latitude: 37.503028, longitude: 127.0237718, price: "₩47" },
  { latitude: 37.506151, longitude: 127.028389, price: "₩50" },
  { latitude: 37.505394, longitude: 127.028807, price: "₩16" },
  { latitude: 37.4918215, longitude: 127.0299, price: "₩38" },
  { latitude: 37.504824, longitude: 127.028217, price: "₩195" },
  { latitude: 37.5012203, longitude: 127.035459, price: "₩55" },
  { latitude: 37.49869, longitude: 127.0323734, price: "₩51" },
  { latitude: 37.5028748, longitude: 127.0394336, price: "₩32" },
  { latitude: 37.5065218, longitude: 127.0303014, price: "₩41" },
  { latitude: 37.4935486, longitude: 127.0280787, price: "₩49" },
  { latitude: 37.4995308, longitude: 127.0354614, price: "₩28" },
  { latitude: 37.50664, longitude: 127.03158, price: "₩64" },
  { latitude: 37.5024767, longitude: 127.0399139, price: "₩49" },
  { latitude: 37.5013577, longitude: 127.0357776, price: "₩40" },
  { latitude: 37.5024315, longitude: 127.0387326, price: "₩36" },
  { latitude: 37.500582, longitude: 127.041064, price: "₩151" },
  { latitude: 37.506508, longitude: 127.03227, price: "₩56" },
  { latitude: 37.505964, longitude: 127.031195, price: "₩64" },
  { latitude: 37.5059947, longitude: 127.0296956, price: "₩50" },
  { latitude: 37.502935, longitude: 127.039946, price: "₩37" },
  { latitude: 37.50271, longitude: 127.040521, price: "₩37" },
  { latitude: 37.50161, longitude: 127.04103, price: "₩43" },
  { latitude: 37.49901, longitude: 127.02851, price: "₩96" },
  { latitude: 37.497393, longitude: 127.029029, price: "₩42" },
  { latitude: 37.505412, longitude: 127.025293, price: "₩28" },
  { latitude: 37.5008366, longitude: 127.0389705, price: "₩41" },
  { latitude: 37.503903, longitude: 127.0350934, price: "₩57" },
  { latitude: 37.4988, longitude: 127.034, price: "₩42" },
  { latitude: 37.50406, longitude: 127.0273, price: "₩17" },
  { latitude: 37.495657, longitude: 127.0351384, price: "₩15" },
  { latitude: 37.5012302, longitude: 127.0422585, price: "₩42" },
  { latitude: 37.494725, longitude: 127.035201, price: "₩14" },
  { latitude: 37.500849, longitude: 127.039129, price: "₩62" },
  { latitude: 37.49232, longitude: 127.031682, price: "₩14" },
  { latitude: 37.502704, longitude: 127.039724, price: "₩42" },
  { latitude: 37.500988, longitude: 127.039632, price: "₩34" },
  { latitude: 37.496069, longitude: 127.02963, price: "₩33" },
  { latitude: 37.4958567, longitude: 127.0299851, price: "₩42" },
  { latitude: 37.499953, longitude: 127.031842, price: "₩37" },
  { latitude: 37.501198, longitude: 127.040513, price: "₩37" },
  { latitude: 37.50329, longitude: 127.03675, price: "₩24" },
  { latitude: 37.5000614, longitude: 127.0247841, price: "₩22" },
  { latitude: 37.50271, longitude: 127.03991, price: "₩33" },
];
구현할 결과물
이번 포스팅에서 구현할 결과물은 에어비앤비(airbnb)에서 사용하고 있는 아래와 같은 구글맵 UI를 구현해볼 것입니다. (커스텀 마커(Custom Marker) 부분만)
구현하기
구현하기 전에 Vue에서 구글맵을 쉽게 사용하기 위해 vue2-google-maps 라이브러리를 활용해서 구글맵 컴포넌트를 세팅하겠습니다. 리액트에서는 아래와 같은 라이브러리를 활용해서 개발하시면 되겠네요.
패키지 설치
구글맵 API를 쉽게 사용하기 위해 vue2-google-maps 라이브러리를 설치합니다.
npm install vue2-google-maps
// or
yarn add vue2-google-maps
리액트에서는 아래와 같은 라이브러리를 활용해서 개발하시면 되겠네요.
google-map-react
Isomorphic component that allows rendering react components on a google map
www.npmjs.com
구글맵 기본 설정
구글맵을 사용하기 위해서는 기본적으로 구글 API Key를 발급받고 아래와 같이 세팅해야 합니다. 구글 지도 API 키를 발급받고 아래 key에 넣어주세요.
// main.js
import Vue from "vue";
import * as VueGoogleMaps from "vue2-google-maps";

Vue.use(VueGoogleMaps, {
  load: {
    key: "google 맵 API 키를 넣어주세요.",
    libraries: "places",
  },
});
구글맵 기본 설정을 완료했다면 컴포넌트에 구글맵 컴포넌트를 추가합니다. 구글맵 컴포넌트가 정상적으로 렌더링 되는지 확인하기 위해 임의의 좌표값으로 center 값을 설정합니다. 구글맵의 사이즈를 스크린 사이즈 전체로 구성하기 위해 컴포넌트 스타일 값을 width 100vw, height 100vh로 구성합니다.
// App.vue
<template>
  <div id="app">
    <GmapMap
      ref="mapRef"
      :center="center"
      :zoom="16"
      style="width: 100vw; height: 100vh" // 구글지도 사이즈 100%
    >
    </GmapMap>
  </div>
</template>

<script>
export default {
  name: "App",
  data() {
    return {
      // 테스트 좌표 데이터
      center: {
        lat: 37.500131499999995,
        lng: 127.03242579999998,
      },
    };
  }
};
</script>

<style>
body {
  margin: 0;
  padding: 0;
}
</style>
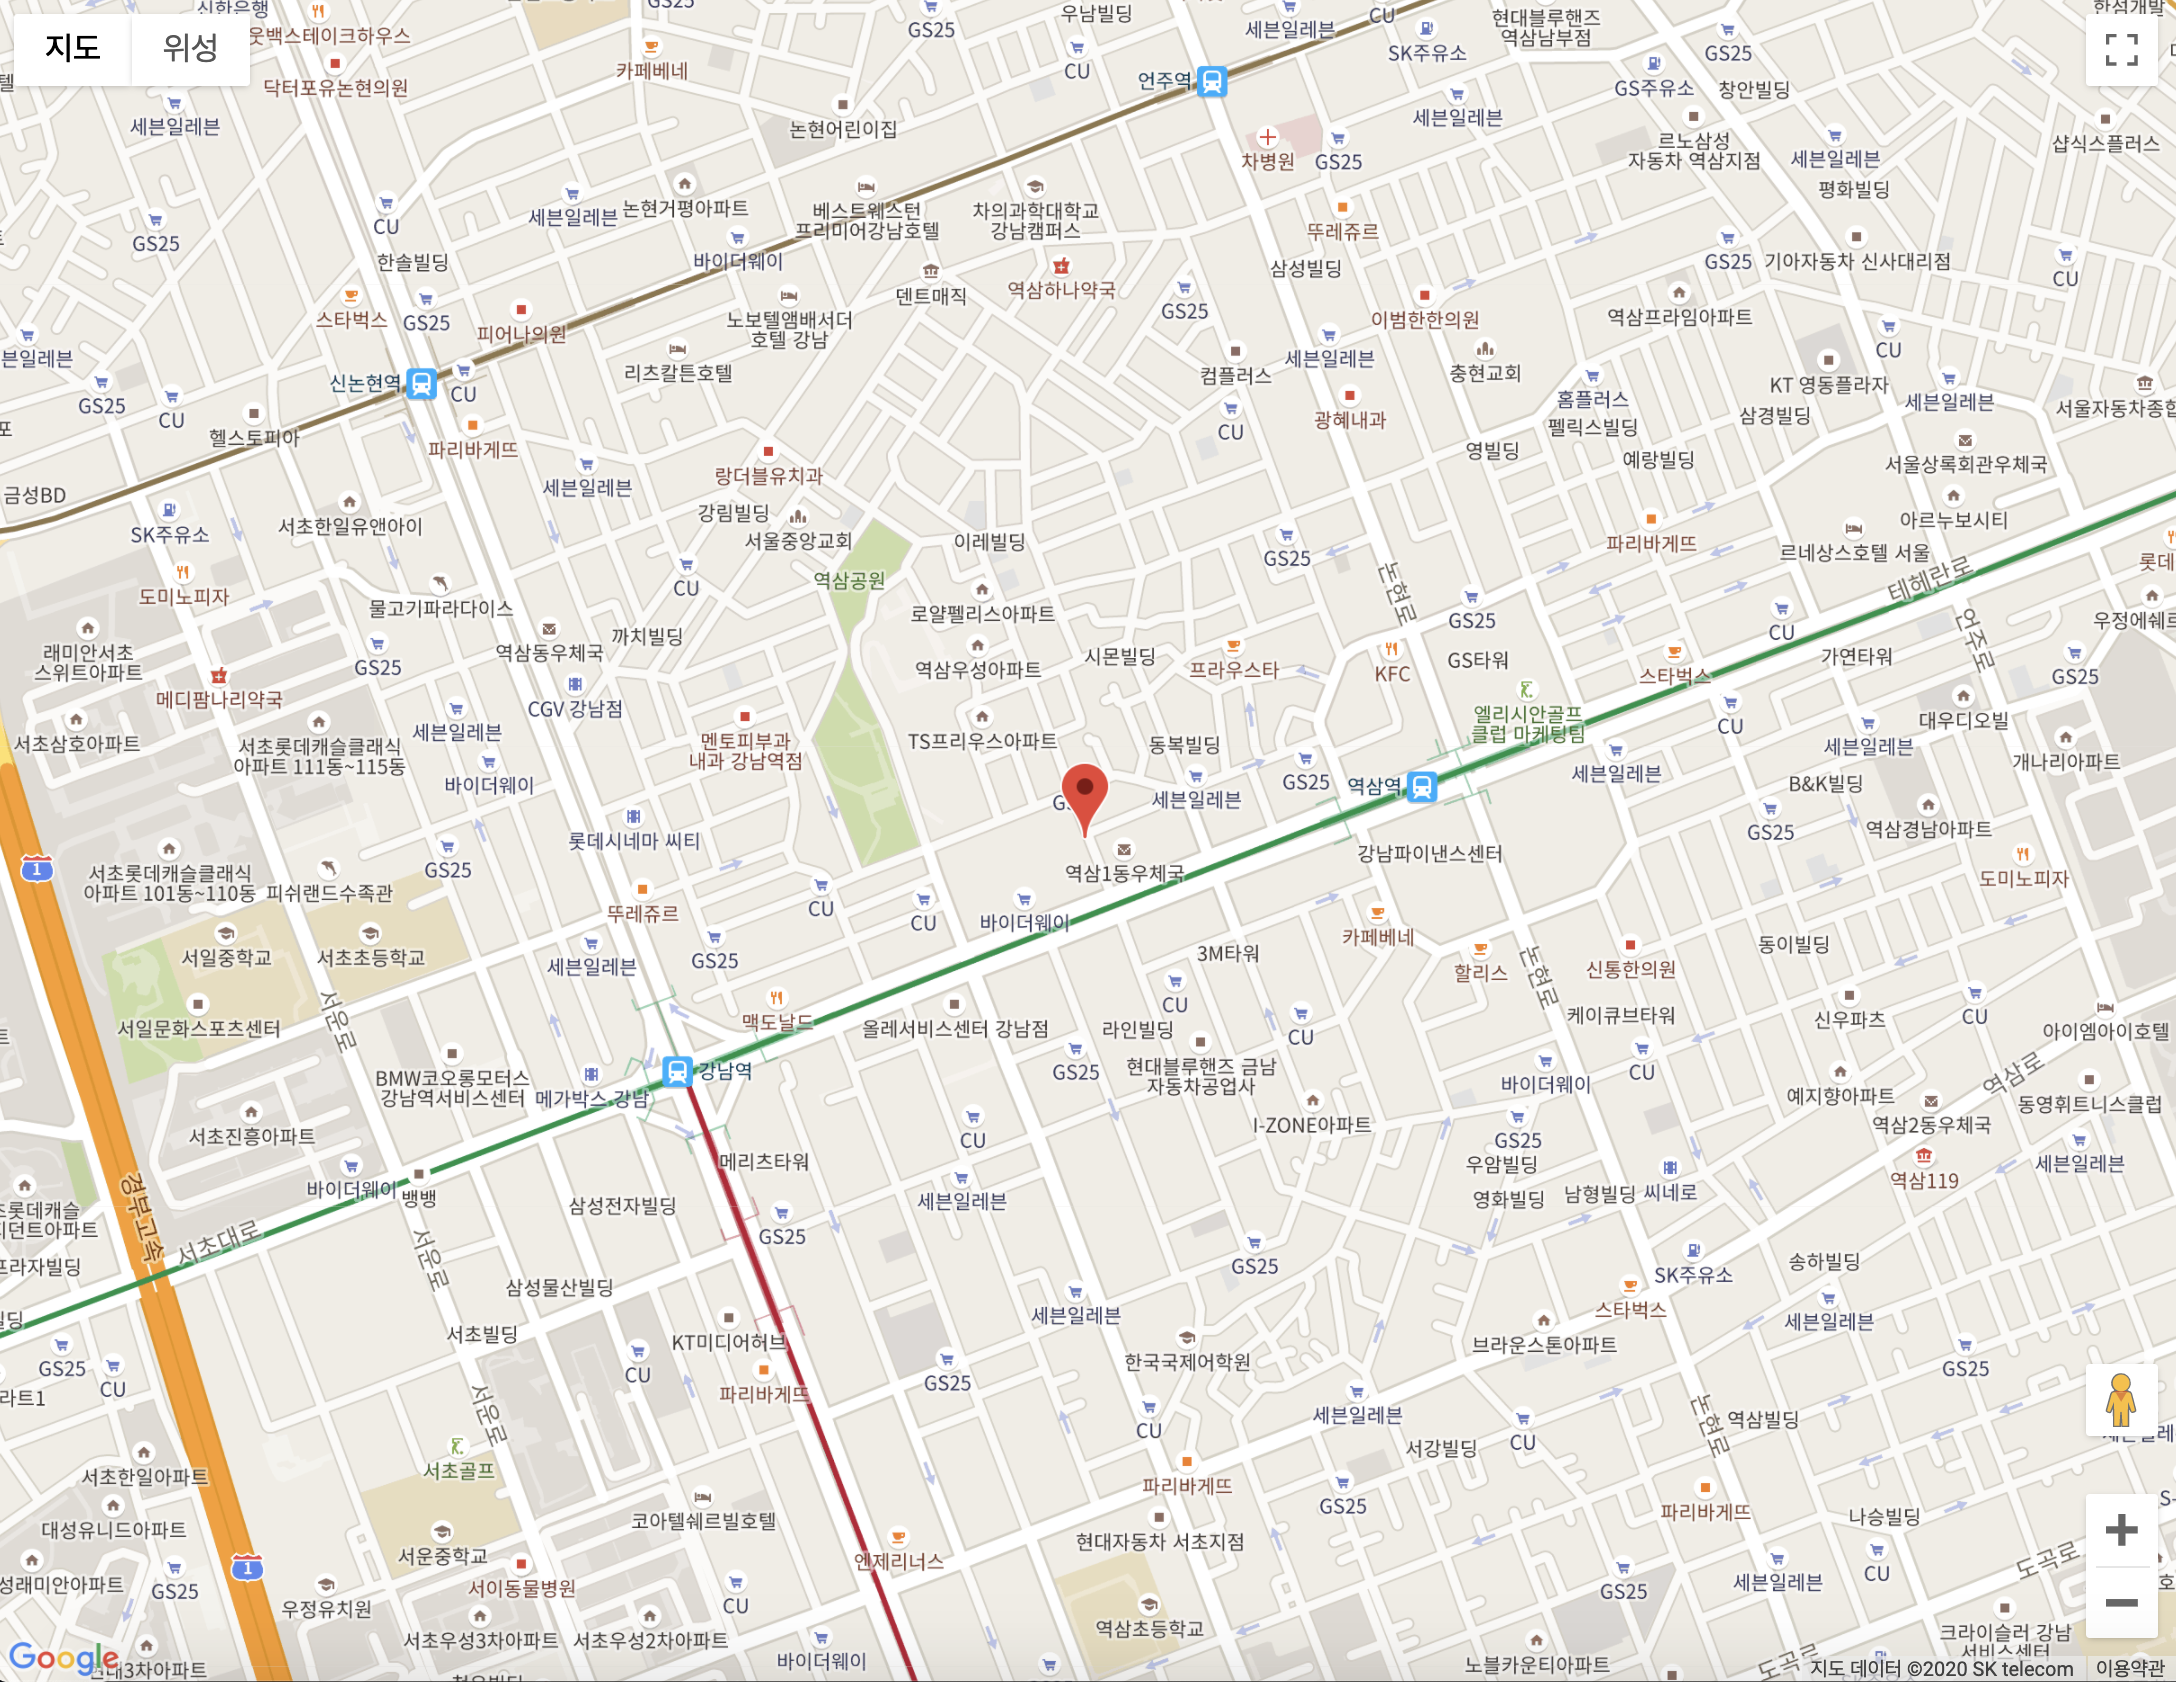
테스트 좌표 데이터를 구글맵 컴포넌트의 center 속성 값으로 할당하면 아래와 같이 구글맵이 렌더링 되는 것을 확인할 수 있습니다.
마커 생성하기
구글맵에 특정 지점에 위치를 찍기 위해서는 마커(Marker)를 사용해야 합니다. 마커의 기본 동작 원리는 아래 구글맵 API 문서를 참고하세요.
Markers | Maps JavaScript API | Google Developers
Introduction A marker identifies a location on a map. By default, a marker uses a standard image. Markers can display custom images, in which case they are usually referred to as "icons." Markers and icons are objects of type Marker. You can set a custom i
developers.google.com
저는 vue2-google-maps 라이브러리에서 제공하고 있는 GmapMarker 컴포넌트를 활용해서 마커를 생성하겠습니다. 마커 데이터를 추가합니다. 마커 데이터는 위경도(lat, lng)로 구성된 포지션(position) 프로퍼티로 구성되어 있습니다.
<template>
<div id="app">
<GmapMap
ref="mapRef"
:center="center"
:zoom="16"
style="width: 100vw; height: 100vh"
>
<GmapMarker
:key="index"
v-for="(m, index) in markers"
:position="m.position"
/>
</GmapMap>
</div>
</template>
<script>
export default {
name: "App",
data() {
return {
center: {
lat: 37.500131499999995,
lng: 127.03242579999998,
},
// 마커 데이터 추가
markers: [
{
position: {
lat: 37.500131499999995,
lng: 127.03242579999998,
},
},
],
};
},
};
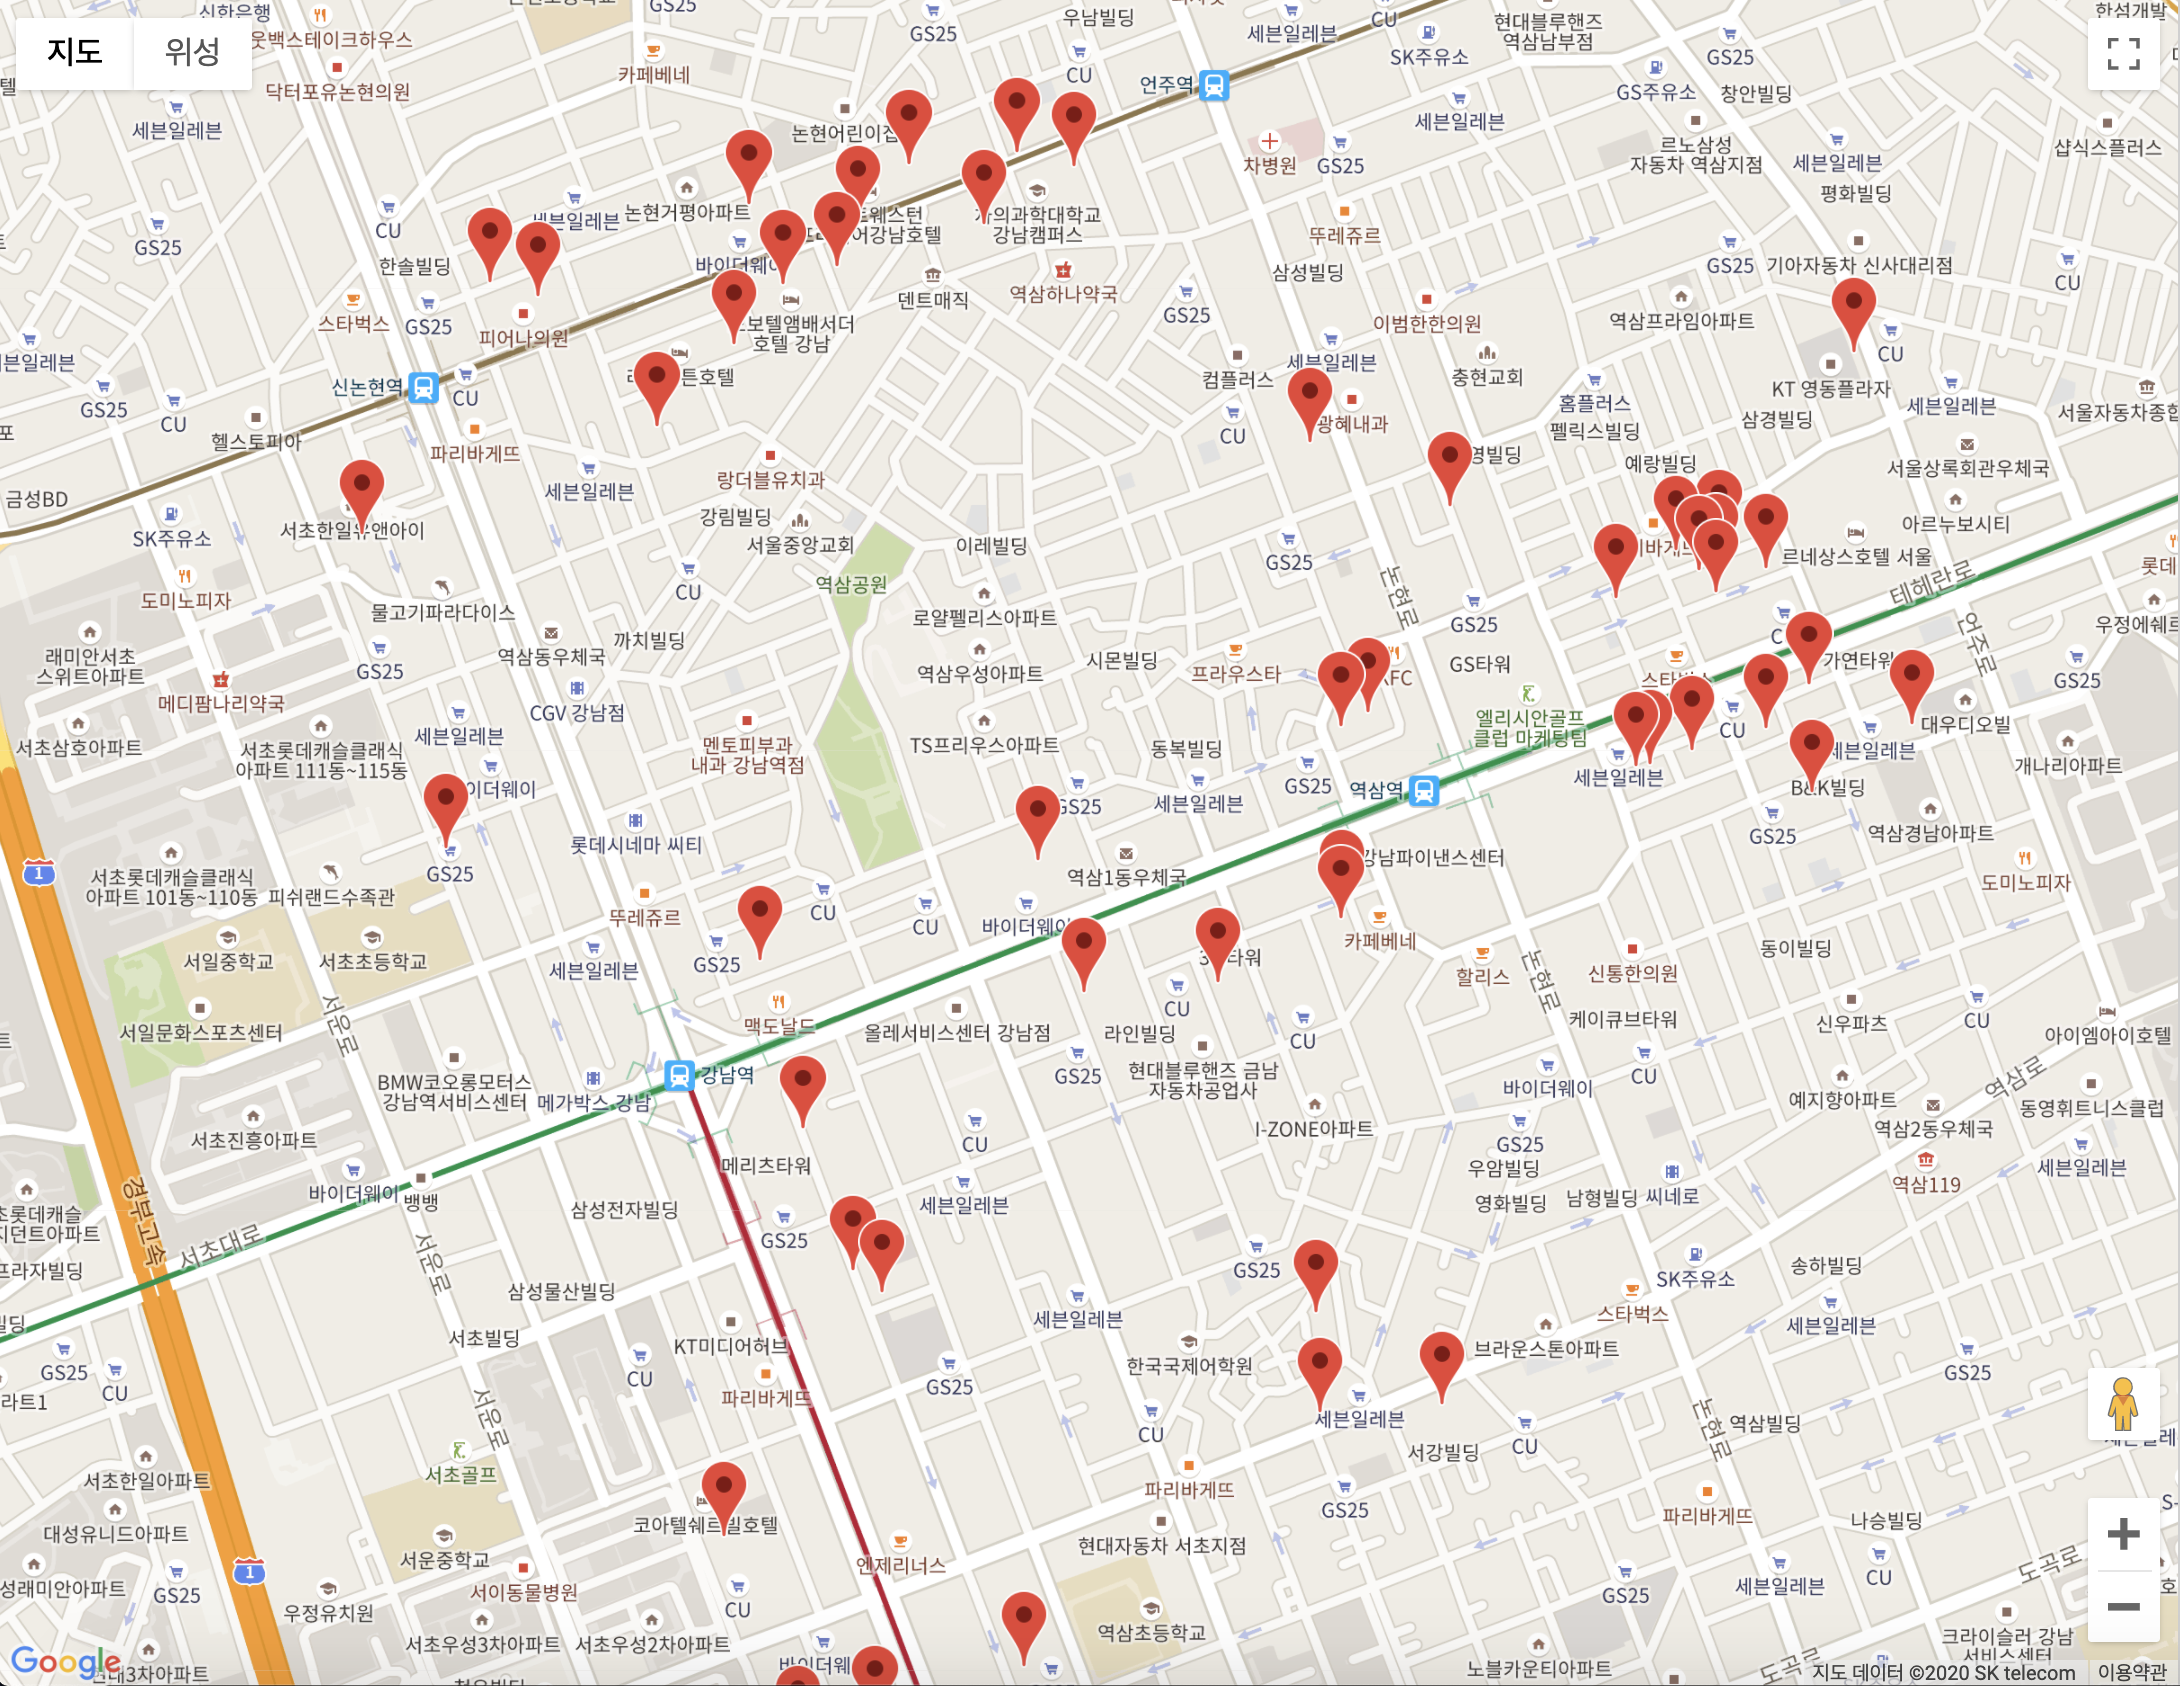
</script>좌측은 위 코드의 결과물이고, 우측은 샘플데이터를 마커 데이터 형식에 맞춰서 마커를 생성한 결과물입니다. 샘플데이터는 들어가기 전에 제공해드린 데이터입니다.
커스텀 마커(Custom Marker) 구현
커스텀 마커는 구글맵 API에서 제공하고 있는 기능입니다. 하지만, 제가 조금 찾아본 결과(제가 못 찾았을 수도 있습니다) 구글맵 API에서 제공하고 있는 커스텀 마커(Custom Marker)는 구글맵에서 제공하고 있는 기본 마커 아이콘을 변경해주는 수준으로 제공하고 있습니다. 커스텀 마커(Custom Marker)의 기본 동작 원리는 아래의 구글 API 문서를 참고하세요.
Customizing a Google Map: Custom Markers | Maps JavaScript API
우리는 이제 에어비앤비에서 사용하고 있는 구글맵 커스텀 마커와 똑같이 만들어볼 것입니다.
우선 구글맵에 마커들을 구성하기 위해 샘플데이터를 컴포넌트에 추가해주세요. 샘플데이터는 아래와 같습니다.
// 마커를 구현하기 위한 샘플데이터
const sample = [
  { latitude: 37.5047592, longitude: 127.0415586, price: "₩52" },
  { latitude: 37.5082055, longitude: 127.0363408, price: "₩66" },
  { latitude: 37.5055726, longitude: 127.0294372, price: "₩40" },
  { latitude: 37.4994, longitude: 127.03545, price: "₩39" },
  { latitude: 37.4916279, longitude: 127.0289673, price: "₩43" },
  { latitude: 37.49479, longitude: 127.03665, price: "₩54" },
  { latitude: 37.5052889, longitude: 127.0258825, price: "₩50" },
  { latitude: 37.503028, longitude: 127.0237718, price: "₩47" },
  { latitude: 37.506151, longitude: 127.028389, price: "₩50" },
  { latitude: 37.505394, longitude: 127.028807, price: "₩16" },
  { latitude: 37.4918215, longitude: 127.0299, price: "₩38" },
  { latitude: 37.504824, longitude: 127.028217, price: "₩195" },
  { latitude: 37.5012203, longitude: 127.035459, price: "₩55" },
  { latitude: 37.49869, longitude: 127.0323734, price: "₩51" },
  { latitude: 37.5028748, longitude: 127.0394336, price: "₩32" },
  { latitude: 37.5065218, longitude: 127.0303014, price: "₩41" },
  { latitude: 37.4935486, longitude: 127.0280787, price: "₩49" },
  { latitude: 37.4995308, longitude: 127.0354614, price: "₩28" },
  { latitude: 37.50664, longitude: 127.03158, price: "₩64" },
  { latitude: 37.5024767, longitude: 127.0399139, price: "₩49" },
  { latitude: 37.5013577, longitude: 127.0357776, price: "₩40" },
  { latitude: 37.5024315, longitude: 127.0387326, price: "₩36" },
  { latitude: 37.500582, longitude: 127.041064, price: "₩151" },
  { latitude: 37.506508, longitude: 127.03227, price: "₩56" },
  { latitude: 37.505964, longitude: 127.031195, price: "₩64" },
  { latitude: 37.5059947, longitude: 127.0296956, price: "₩50" },
  { latitude: 37.502935, longitude: 127.039946, price: "₩37" },
  { latitude: 37.50271, longitude: 127.040521, price: "₩37" },
  { latitude: 37.50161, longitude: 127.04103, price: "₩43" },
  { latitude: 37.49901, longitude: 127.02851, price: "₩96" },
  { latitude: 37.497393, longitude: 127.029029, price: "₩42" },
  { latitude: 37.505412, longitude: 127.025293, price: "₩28" },
  { latitude: 37.5008366, longitude: 127.0389705, price: "₩41" },
  { latitude: 37.503903, longitude: 127.0350934, price: "₩57" },
  { latitude: 37.4988, longitude: 127.034, price: "₩42" },
  { latitude: 37.50406, longitude: 127.0273, price: "₩17" },
  { latitude: 37.495657, longitude: 127.0351384, price: "₩15" },
  { latitude: 37.5012302, longitude: 127.0422585, price: "₩42" },
  { latitude: 37.494725, longitude: 127.035201, price: "₩14" },
  { latitude: 37.500849, longitude: 127.039129, price: "₩62" },
  { latitude: 37.49232, longitude: 127.031682, price: "₩14" },
  { latitude: 37.502704, longitude: 127.039724, price: "₩42" },
  { latitude: 37.500988, longitude: 127.039632, price: "₩34" },
  { latitude: 37.496069, longitude: 127.02963, price: "₩33" },
  { latitude: 37.4958567, longitude: 127.0299851, price: "₩42" },
  { latitude: 37.499953, longitude: 127.031842, price: "₩37" },
  { latitude: 37.501198, longitude: 127.040513, price: "₩37" },
  { latitude: 37.50329, longitude: 127.03675, price: "₩24" },
  { latitude: 37.5000614, longitude: 127.0247841, price: "₩22" },
  { latitude: 37.50271, longitude: 127.03991, price: "₩33" },
];
버튼을 클릭했을 때 구글맵 컴포넌트에 마커를 추가하기 위해 버튼을 하나 추가합니다. 구글맵 API를 활용하기 위해 구글 API 객체를 가져옵니다.
import { gmapApi as google } from "vue2-google-maps";
// like window.google
저는 computed에 google API 객체를 추가했습니다. google API 객체가 활성화되었을 때 커스텀 마커 클래스를 세팅하기 위해 watch를 활용합니다. watch에서 google computed값이 변경됨을 감지하면 initCustomMarker 함수를 사용해서 CustomMarker에 커스텀 마커 클래스를 할당합니다.
<template>
  <div id="app">
    <button @click="addMarkers">add</button>
    <button @click="clearMarkers">clear</button>
    <GmapMap
      ref="mapRef"
      :center="center"
      :zoom="16"
      style="width: 100vw; height: 100vh"
    />
  </div>
</template>

<script>
import shuffle from "lodash/shuffle";
import take from "lodash/take";
import initCustomMarker from "./custom-marker";
import { gmapApi as google } from "vue2-google-maps";
let CustomMarker;
const sample = [
  { latitude: 37.5047592, longitude: 127.0415586, price: "₩52" },
  { latitude: 37.5082055, longitude: 127.0363408, price: "₩66" },
  { latitude: 37.5055726, longitude: 127.0294372, price: "₩40" },
  { latitude: 37.4994, longitude: 127.03545, price: "₩39" },
  { latitude: 37.4916279, longitude: 127.0289673, price: "₩43" },
  { latitude: 37.49479, longitude: 127.03665, price: "₩54" },
  { latitude: 37.5052889, longitude: 127.0258825, price: "₩50" },
  { latitude: 37.503028, longitude: 127.0237718, price: "₩47" },
  { latitude: 37.506151, longitude: 127.028389, price: "₩50" },
  { latitude: 37.505394, longitude: 127.028807, price: "₩16" },
  { latitude: 37.4918215, longitude: 127.0299, price: "₩38" },
  { latitude: 37.504824, longitude: 127.028217, price: "₩195" },
  { latitude: 37.5012203, longitude: 127.035459, price: "₩55" },
  { latitude: 37.49869, longitude: 127.0323734, price: "₩51" },
  { latitude: 37.5028748, longitude: 127.0394336, price: "₩32" },
  { latitude: 37.5065218, longitude: 127.0303014, price: "₩41" },
  { latitude: 37.4935486, longitude: 127.0280787, price: "₩49" },
  { latitude: 37.4995308, longitude: 127.0354614, price: "₩28" },
  { latitude: 37.50664, longitude: 127.03158, price: "₩64" },
  { latitude: 37.5024767, longitude: 127.0399139, price: "₩49" },
  { latitude: 37.5013577, longitude: 127.0357776, price: "₩40" },
  { latitude: 37.5024315, longitude: 127.0387326, price: "₩36" },
  { latitude: 37.500582, longitude: 127.041064, price: "₩151" },
  { latitude: 37.506508, longitude: 127.03227, price: "₩56" },
  { latitude: 37.505964, longitude: 127.031195, price: "₩64" },
  { latitude: 37.5059947, longitude: 127.0296956, price: "₩50" },
  { latitude: 37.502935, longitude: 127.039946, price: "₩37" },
  { latitude: 37.50271, longitude: 127.040521, price: "₩37" },
  { latitude: 37.50161, longitude: 127.04103, price: "₩43" },
  { latitude: 37.49901, longitude: 127.02851, price: "₩96" },
  { latitude: 37.497393, longitude: 127.029029, price: "₩42" },
  { latitude: 37.505412, longitude: 127.025293, price: "₩28" },
  { latitude: 37.5008366, longitude: 127.0389705, price: "₩41" },
  { latitude: 37.503903, longitude: 127.0350934, price: "₩57" },
  { latitude: 37.4988, longitude: 127.034, price: "₩42" },
  { latitude: 37.50406, longitude: 127.0273, price: "₩17" },
  { latitude: 37.495657, longitude: 127.0351384, price: "₩15" },
  { latitude: 37.5012302, longitude: 127.0422585, price: "₩42" },
  { latitude: 37.494725, longitude: 127.035201, price: "₩14" },
  { latitude: 37.500849, longitude: 127.039129, price: "₩62" },
  { latitude: 37.49232, longitude: 127.031682, price: "₩14" },
  { latitude: 37.502704, longitude: 127.039724, price: "₩42" },
  { latitude: 37.500988, longitude: 127.039632, price: "₩34" },
  { latitude: 37.496069, longitude: 127.02963, price: "₩33" },
  { latitude: 37.4958567, longitude: 127.0299851, price: "₩42" },
  { latitude: 37.499953, longitude: 127.031842, price: "₩37" },
  { latitude: 37.501198, longitude: 127.040513, price: "₩37" },
  { latitude: 37.50329, longitude: 127.03675, price: "₩24" },
  { latitude: 37.5000614, longitude: 127.0247841, price: "₩22" },
  { latitude: 37.50271, longitude: 127.03991, price: "₩33" },
];
export default {
  name: "App",
  data() {
    return {
      CustomMarker: null,
      center: {
        lat: 37.500131499999995,
        lng: 127.03242579999998,
      },
      data: sample,
      markers: [],
    };
  },
  computed: {
    google,
  },
  watch: {
    google(val) {
      CustomMarker = initCustomMarker(val);
    },
  },
  methods: {
    clearMarkers() {
      this.markers.map((marker) => {
        marker.onRemove();
      });
      this.markers = [];
    },
    addMarkers() {
      take(shuffle(this.data), 20).map(({ price, latitude, longitude }, i) => {
        const el = document.createElement("div");
        el.textContent = price;
        el.setAttribute("data-marker-index", i);

        const t = new CustomMarker(
          new this.google.maps.LatLng(latitude, longitude),
          el
        );

        this.$refs["mapRef"].$mapPromise.then((map) => {
          // 지도에 커스텀 마커를 세팅한다.
          t.setMap(map);
        });

        // 마커 인스턴스들을 저장한다.
        this.markers.push(t);
      });
    },
  },
};
</script>
initCustomMarker 함수는 아래와 같습니다. 구글맵 API의 OverlayView 클래스를 활용해서 커스텀 마커를 구현합니다. 구글맵 API OverlayView의 기본 동작 원리는 아래를 참고하세요.
Custom Overlays | Maps JavaScript API | Google Developers
구글맵 API 객체를 확장해서 커스텀마커 클래스를 생성해야 되기 때문에 구글맵 API 객체를 전달받아야 합니다.
// custom-marker.js
export default (google) => {
  return class CustomMarker extends google.maps.OverlayView {
    constructor(position, content, options = { classname: "custom-marker" }) {
      super();
      const { classname } = options;
      this.options = options;
      this.position = position;
      content.classList.add(classname);
      const bubbleAnchor = document.createElement("div");
      bubbleAnchor.classList.add(`${classname}-anchor`);
      bubbleAnchor.appendChild(content);
      this.containerDiv = document.createElement("div");
      this.containerDiv.classList.add(`${classname}-container`);
      this.containerDiv.appendChild(bubbleAnchor);
    }
    onAdd() {
      this.getPanes().floatPane.appendChild(this.containerDiv);
    }
    onRemove() {
      if (this.containerDiv.parentElement) {
        this.containerDiv.parentElement.removeChild(this.containerDiv);
      }
    }
    draw() {
      const divPosition = this.getProjection().fromLatLngToDivPixel(
        this.position
      );

      const display =
        Math.abs(divPosition.x) < 4000 && Math.abs(divPosition.y) < 4000
          ? "block"
          : "none";

      if (display === "block") {
        this.containerDiv.style.left = divPosition.x + "px";
        this.containerDiv.style.top = divPosition.y + "px";
      }

      if (this.containerDiv.style.display !== display) {
        this.containerDiv.style.display = display;
      }
    }
  };
};
우리가 만든 커스텀 마커의 스타일을 추가합니다. 커스텀 마커 스타일은 우리가 커스텀 마커를 추가할 컴포넌트에 추가하겠습니다.
// 마커 스타일
<style lang="scss">
//
.custom-marker {
  position: absolute;
  top: 0;
  left: 0;
  transform: translate(-50%, -100%);
  background-color: white;
  padding: 0 8px;
  border-radius: 28px;
  box-shadow: rgba(0, 0, 0, 0.08) 0px 0px 0px 1px,
    rgba(0, 0, 0, 0.18) 0px 1px 2px;
  color: #222;
  overflow-y: auto;
  height: 28px;
  line-height: 28px;
  font-weight: bold;
  cursor: pointer;
  transition: transform 0.15s ease-in-out;
  font-size: 14px;
}
.custom-marker:hover {
  transform: translate(-50%, -100%) scale(1.2);
}
.custom-marker-anchor {
  position: absolute;
  width: 100%;
  bottom: 8px;
  left: 0;
}

.custom-marker-container {
  cursor: auto;
  height: 0;
  position: absolute;
  width: 200px;
  &.active {
    .custom-marker {
      z-index: 1000;
      background-color: #f7530e;
      color: #fff;
      transform: translate(-50%, -100%) scale(1.1);
    }
  }
}
</style>
마커를 추가하기 위해 addMarkers 메서드를 추가합니다. lodash take, shuffle를 적절하게 활용해서 랜덤으로 샘플데이터에서 임의의 20개의 값을 가져와서 화면에 마커를 찍어주는 코드입니다.
{
data() {
return {
...,
data: sample, // 샘플데이터
markers: [], // 마커 인스턴스들을 저장하기 위해 markers 데이터 추가
};
},
methods: {
// 마커 추가
addMarkers() {
take(shuffle(this.data), 20).map(({ price, latitude, longitude }, i) => {
const el = document.createElement("div");
el.textContent = price;
el.setAttribute("data-marker-index", i);
const t = new CustomMarker(
new this.google.maps.LatLng(latitude, longitude),
el
);
this.$refs["mapRef"].$mapPromise.then((map) => {
// 지도에 커스텀 마커를 세팅한다.
t.setMap(map);
});
// 마커 인스턴스들을 저장한다.
this.markers.push(t);
});
},
}
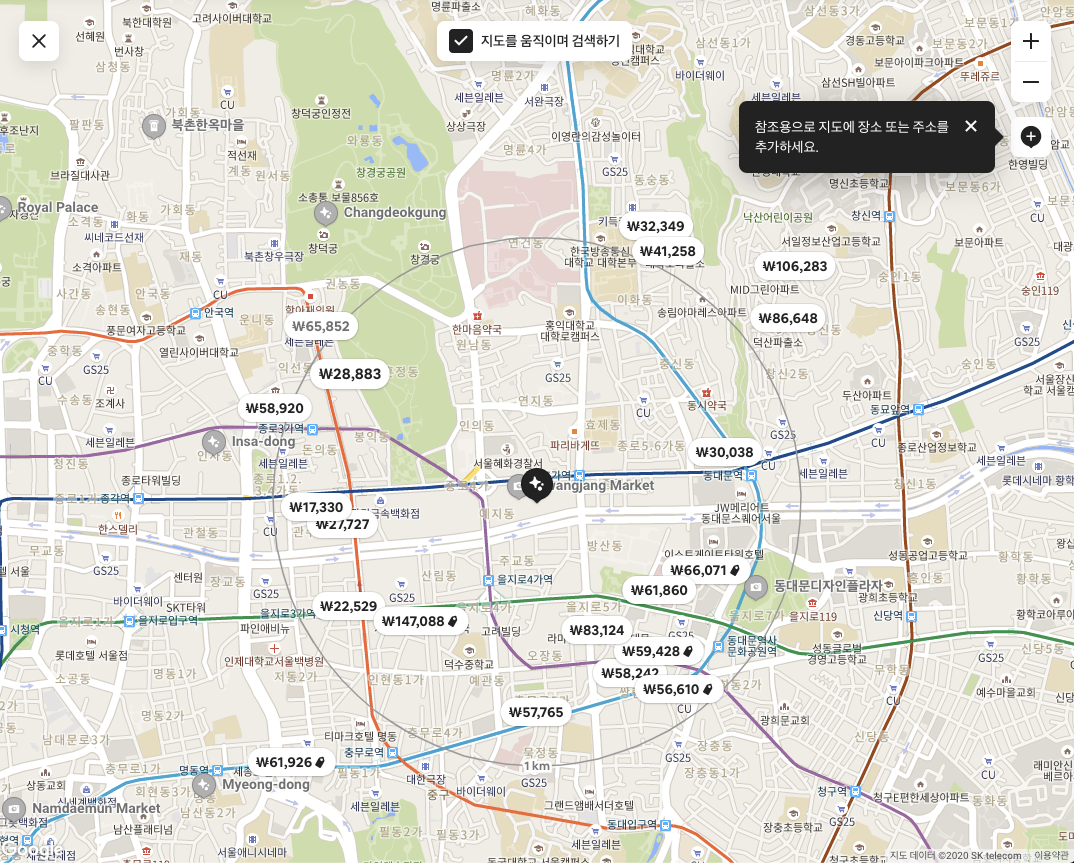
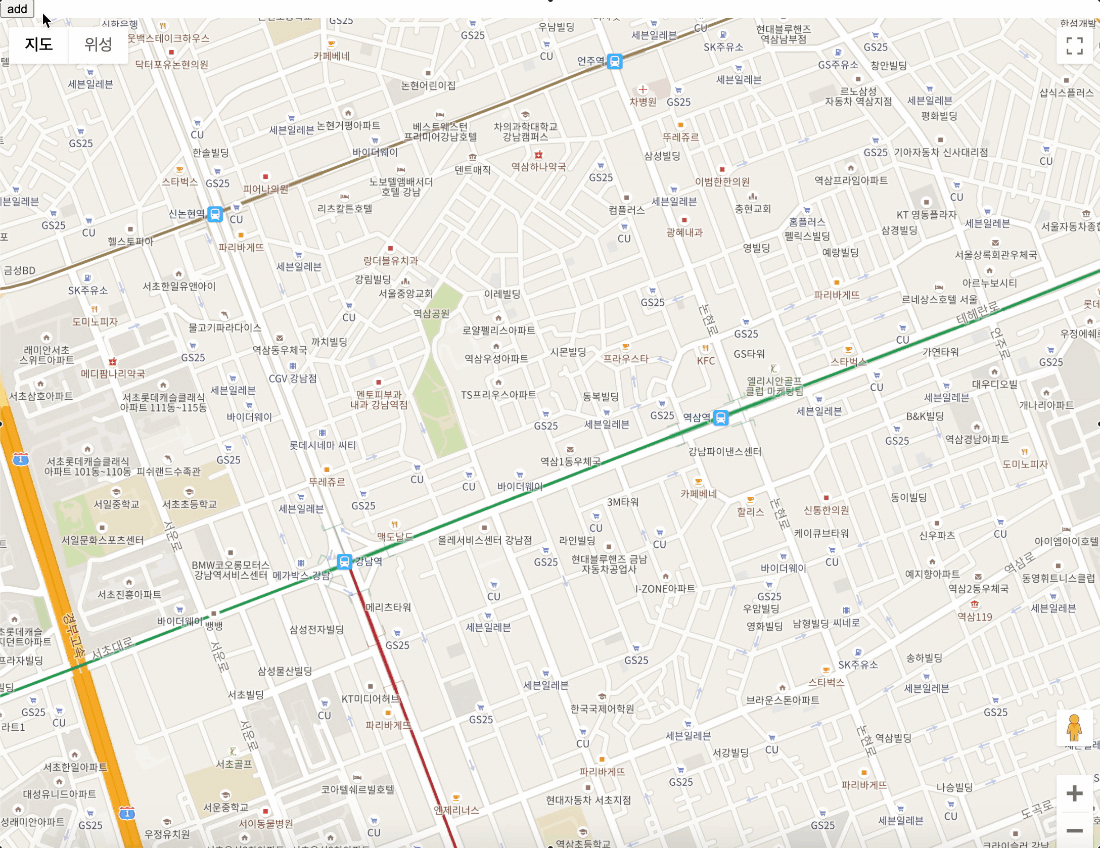
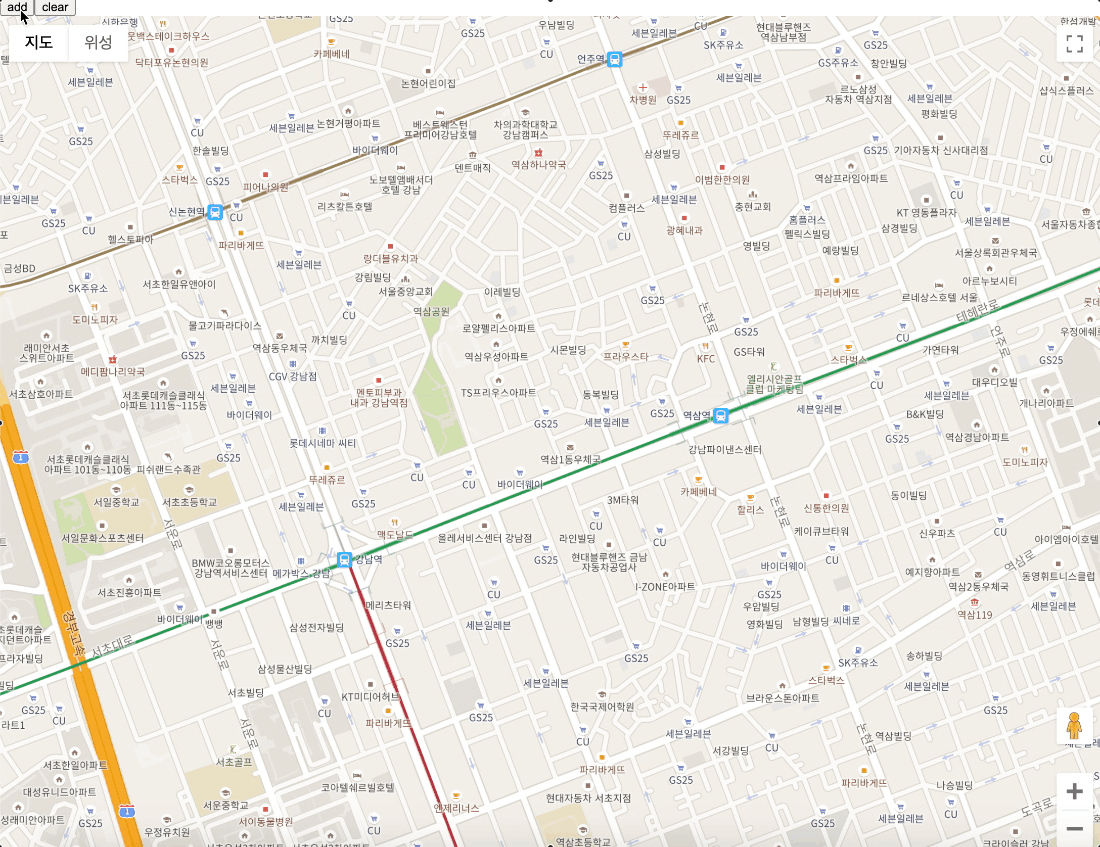
}add버튼에 addMarkers 메서드를 연결하고 add 버튼을 누르면 아래와 같이 커스텀 마커가 구글맵에 찍히게 됩니다.
커스텀 마커를 구글맵에서 제거하는 로직도 필요합니다. 커스텀 마커를 제거하는 코드를 구현합니다. clearMarkers 메서드를 추가합니다. 코드는 굉장히 단순합니다. 우리가 마커를 추가할 때 markers 데이터에 모든 마커 인스턴스를 저장한 것 기억하시죠? 저장된 마커 인스턴스를 순회하면서 마커 인스턴스의 onRemove 메서드를 실행해주면 끝입니다. markers 데이터의 순회가 끝나면 markers 데이터를 초기화합니다.
methods: {
  clearMarkers() {
    this.markers.map((marker) => {
      marker.onRemove();
    });
    this.markers = [];
  },
  ...
}
전체 코드
구글 지도(Google Map) API 커스텀 마커(Custom Marker) 구현 로직의 전체 코드는 아래와 같습니다. 아래 코드를 참고해서 커스텀 마커(Custom Marker)를 구현하실 때 참고해주세요.
<template>
  <div id="app">
    <button @click="addMarkers">add</button>
    <button @click="clearMarkers">clear</button>
    <GmapMap
      ref="mapRef"
      :center="center"
      :zoom="16"
      style="width: 100vw; height: 100vh"
    />
  </div>
</template>

<script>
import shuffle from "lodash/shuffle";
import take from "lodash/take";
import initCustomMarker from "./custom-marker";
import { gmapApi as google } from "vue2-google-maps";
let CustomMarker;

const sample = [
  { latitude: 37.5047592, longitude: 127.0415586, price: "₩52" },
  { latitude: 37.5082055, longitude: 127.0363408, price: "₩66" },
  { latitude: 37.5055726, longitude: 127.0294372, price: "₩40" },
  { latitude: 37.4994, longitude: 127.03545, price: "₩39" },
  { latitude: 37.4916279, longitude: 127.0289673, price: "₩43" },
  { latitude: 37.49479, longitude: 127.03665, price: "₩54" },
  { latitude: 37.5052889, longitude: 127.0258825, price: "₩50" },
  { latitude: 37.503028, longitude: 127.0237718, price: "₩47" },
  { latitude: 37.506151, longitude: 127.028389, price: "₩50" },
  { latitude: 37.505394, longitude: 127.028807, price: "₩16" },
  { latitude: 37.4918215, longitude: 127.0299, price: "₩38" },
  { latitude: 37.504824, longitude: 127.028217, price: "₩195" },
  { latitude: 37.5012203, longitude: 127.035459, price: "₩55" },
  { latitude: 37.49869, longitude: 127.0323734, price: "₩51" },
  { latitude: 37.5028748, longitude: 127.0394336, price: "₩32" },
  { latitude: 37.5065218, longitude: 127.0303014, price: "₩41" },
  { latitude: 37.4935486, longitude: 127.0280787, price: "₩49" },
  { latitude: 37.4995308, longitude: 127.0354614, price: "₩28" },
  { latitude: 37.50664, longitude: 127.03158, price: "₩64" },
  { latitude: 37.5024767, longitude: 127.0399139, price: "₩49" },
  { latitude: 37.5013577, longitude: 127.0357776, price: "₩40" },
  { latitude: 37.5024315, longitude: 127.0387326, price: "₩36" },
  { latitude: 37.500582, longitude: 127.041064, price: "₩151" },
  { latitude: 37.506508, longitude: 127.03227, price: "₩56" },
  { latitude: 37.505964, longitude: 127.031195, price: "₩64" },
  { latitude: 37.5059947, longitude: 127.0296956, price: "₩50" },
  { latitude: 37.502935, longitude: 127.039946, price: "₩37" },
  { latitude: 37.50271, longitude: 127.040521, price: "₩37" },
  { latitude: 37.50161, longitude: 127.04103, price: "₩43" },
  { latitude: 37.49901, longitude: 127.02851, price: "₩96" },
  { latitude: 37.497393, longitude: 127.029029, price: "₩42" },
  { latitude: 37.505412, longitude: 127.025293, price: "₩28" },
  { latitude: 37.5008366, longitude: 127.0389705, price: "₩41" },
  { latitude: 37.503903, longitude: 127.0350934, price: "₩57" },
  { latitude: 37.4988, longitude: 127.034, price: "₩42" },
  { latitude: 37.50406, longitude: 127.0273, price: "₩17" },
  { latitude: 37.495657, longitude: 127.0351384, price: "₩15" },
  { latitude: 37.5012302, longitude: 127.0422585, price: "₩42" },
  { latitude: 37.494725, longitude: 127.035201, price: "₩14" },
  { latitude: 37.500849, longitude: 127.039129, price: "₩62" },
  { latitude: 37.49232, longitude: 127.031682, price: "₩14" },
  { latitude: 37.502704, longitude: 127.039724, price: "₩42" },
  { latitude: 37.500988, longitude: 127.039632, price: "₩34" },
  { latitude: 37.496069, longitude: 127.02963, price: "₩33" },
  { latitude: 37.4958567, longitude: 127.0299851, price: "₩42" },
  { latitude: 37.499953, longitude: 127.031842, price: "₩37" },
  { latitude: 37.501198, longitude: 127.040513, price: "₩37" },
  { latitude: 37.50329, longitude: 127.03675, price: "₩24" },
  { latitude: 37.5000614, longitude: 127.0247841, price: "₩22" },
  { latitude: 37.50271, longitude: 127.03991, price: "₩33" },
];
export default {
  name: "App",
  data() {
    return {
      CustomMarker: null,
      center: {
        lat: 37.500131499999995,
        lng: 127.03242579999998,
      },
      data: sample,
      markers: [],
    };
  },
  computed: {
    google,
  },
  watch: {
    google(val) {
      CustomMarker = initCustomMarker(val);
    },
  },
  methods: {
    clearMarkers() {
      this.markers.map((marker) => {
        marker.onRemove();
      });
      this.markers = [];
    },
    addMarkers() {
      take(shuffle(this.data), 20).map(({ price, latitude, longitude }, i) => {
        const el = document.createElement("div");
        el.textContent = price;
        el.setAttribute("data-marker-index", i);

        const t = new CustomMarker(
          new this.google.maps.LatLng(latitude, longitude),
          el
        );

        this.$refs["mapRef"].$mapPromise.then((map) => {
          // 지도에 커스텀 마커를 세팅한다.
          t.setMap(map);
        });

        // 마커 인스턴스들을 저장한다.
        this.markers.push(t);
      });
    },
  },
};
</script>

<style>
body {
  margin: 0;
  padding: 0;
}
</style>

<style lang="scss">
.custom-marker {
  position: absolute;
  top: 0;
  left: 0;
  transform: translate(-50%, -100%);
  background-color: white;
  padding: 0 8px;
  border-radius: 28px;
  box-shadow: rgba(0, 0, 0, 0.08) 0px 0px 0px 1px,
    rgba(0, 0, 0, 0.18) 0px 1px 2px;
  color: #222;
  overflow-y: auto;
  height: 28px;
  line-height: 28px;
  font-weight: bold;
  cursor: pointer;
  transition: transform 0.15s ease-in-out;
  font-size: 14px;
}
.custom-marker:hover {
  transform: translate(-50%, -100%) scale(1.2);
}
.custom-marker-anchor {
  position: absolute;
  width: 100%;
  bottom: 8px;
  left: 0;
}

.custom-marker-container {
  cursor: auto;
  height: 0;
  position: absolute;
  width: 200px;
  &.active {
    .custom-marker {
      z-index: 1000;
      background-color: #f7530e;
      color: #fff;
      transform: translate(-50%, -100%) scale(1.1);
    }
  }
}
</style>
export default (google) => {
  return class CustomMarker extends google.maps.OverlayView {
    constructor(position, content, options = { classname: "custom-marker" }) {
      super();
      const { classname } = options;
      this.options = options;
      this.position = position;
      content.classList.add(classname);
      const bubbleAnchor = document.createElement("div");
      bubbleAnchor.classList.add(`${classname}-anchor`);
      bubbleAnchor.appendChild(content);
      this.containerDiv = document.createElement("div");
      this.containerDiv.classList.add(`${classname}-container`);
      this.containerDiv.appendChild(bubbleAnchor);
    }
    onAdd() {
      this.getPanes().floatPane.appendChild(this.containerDiv);
    }
    onRemove() {
      if (this.containerDiv.parentElement) {
        this.containerDiv.parentElement.removeChild(this.containerDiv);
      }
    }
    draw() {
      const divPosition = this.getProjection().fromLatLngToDivPixel(
        this.position
      );
      // Hide the popup when it is far out of view.
      const display =
        Math.abs(divPosition.x) < 4000 && Math.abs(divPosition.y) < 4000
          ? "block"
          : "none";

      if (display === "block") {
        this.containerDiv.style.left = divPosition.x + "px";
        this.containerDiv.style.top = divPosition.y + "px";
      }

      if (this.containerDiv.style.display !== display) {
        this.containerDiv.style.display = display;
      }
    }
  };
};
'개발 > Third-party' 카테고리의 다른 글
| 카카오톡 링크 공유 API 초간단 사용방법 (0) | 2020.09.15 |
|---|---|
| 카카오톡 링크 공유 API ErrorCode(4002) 에러 간단하게 해결하는 방법 (Javascript SDK 카카오톡 링크 공유 API) (2) | 2020.08.07 |
| 카카오 로그인(Kakao Login) 인증 API을 활용해서 간단하게 사용자 로그인 처리하는 방법 (21) | 2020.07.23 |
| 카카오맵(Kakao 지도) API 초간단 사용방법 (for Web) (0) | 2020.02.20 |
이 포스팅은 쿠팡파트너스 활동의 일환으로, 이에 따른 일정액의 수수료를 제공받습니다.